Tuesday 28 June 2011

Painting guide for the Scifi Bunker

Last week I managed to upload a tutorial for you to create your own cheap Scifi Bunkers and this weekend I managed to paint it up.
I also recorded the painting process with color formulas and brands of materials etc... I hope that everyone can check this small painting guide and manage to replicate the weathering effects and rust.

One day, with more time, I will dedicate several posts to explaining the techniques I used but more in depth by making step by step tutorials with pictures... for now this small guide here is a good simple starting point.

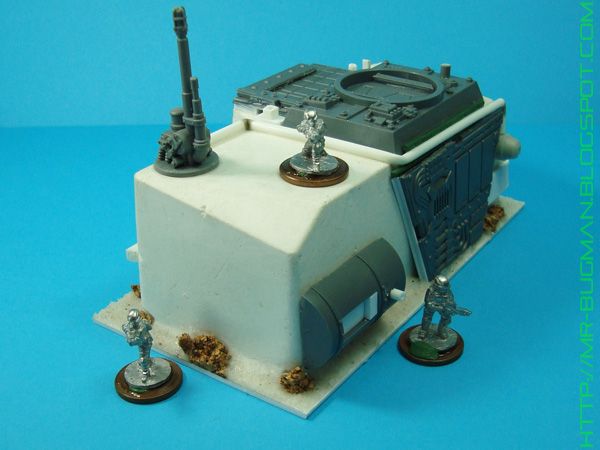
So here is the painted bunker:


The color formulas:
All acrylic paints used are Vallejo's model Color (VMC) unless stated otherwise

Bunker green walls

  1. Dark blue grey + Stone grey + Black green (70904+70884+70980)
  2. Apply liquid mask
  3. Games workshop Gryphone sepia washes
  4. Remove mask
  5. Sponge speckled painting with Stone grey (70904)
  6. Mig Pigments Industrial dirt P039, Concrete P026 and Black smoke P023
Bunker rusty metals

  1. Woodgrain (828)
  2. Smoke used as wash (70939)
  3. Liquid mask
  4. Privateer press P3 Trollblood Highlight
  5. Smoke used as wash (70939)
  6. Remove mask
  7. Mig Pigments Old rust P230, Standart rust P025
Bunker details

  1. Golden Olive (70857)
  2. Gamesworkshop Thraka green wash
  3. Green fluo (737)
  4. Ivory (918)

Bunker base

  1. Yellow green (881)
  2. US field drab (873)
  3. Gamesworkshop Gryphone sepia wash
  4. Mig Pigments Rubble dust P234
  5. Army painter swamp tuft 6mm

Thats it and now the gallery.


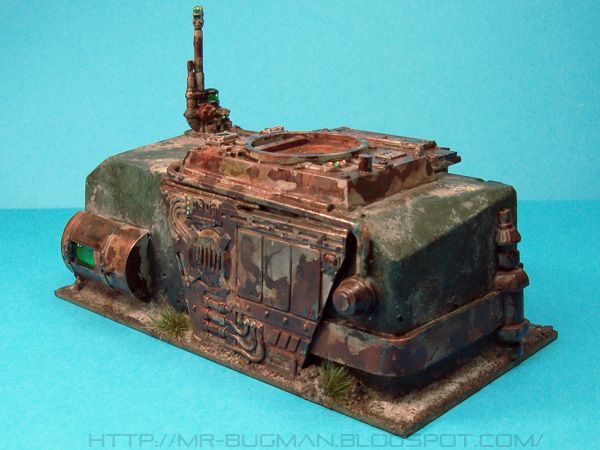
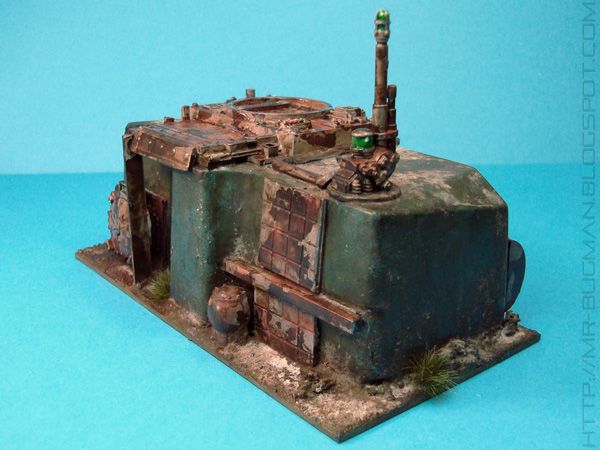
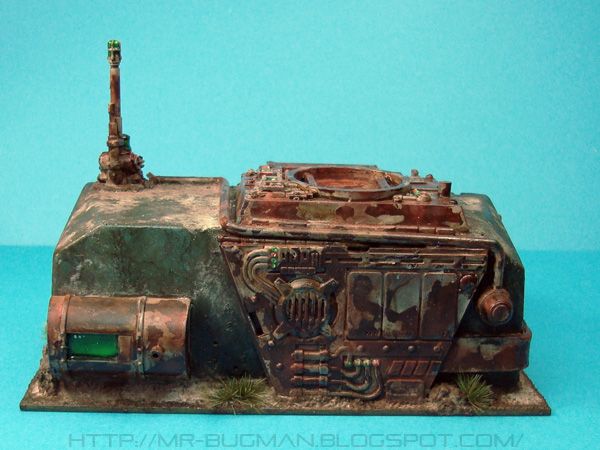
This bunker is finished !
I hope you enjoyed this mini tutorial,... but its only the first of several terrain pieces I'm developing for my 15mm battlefields. The next bunker will be the communications bunker and I already started it. Stay tuned for more updates soon.

I'm happy with the painting because this bunker can fit a abandoned lunar terrain or post apocalyptic terrain on a alternative future on earth etc, Its generic enough to fit several different universes of gaming that I intend to develop... and it also fits with the 28mm terrain I have painted in the past and that I will convert to 15mm...

Cheers.


Tuesday 21 June 2011

How to create a cheap Scifi Bunker ( Tutorial )

Wargaming is not a cheap activity and many things can make this hobby quite heavy on your wallet if you don't take control of your projects.
With this in mind I was searching on the web for futuristic bunkers and buildings for my scifi wargames, there are some nice options and not that expensive in 15mm, but things start to accumulate and 1,2... 10 buildings later and you have a fat bill just on terrain. If go to 28mm the bill is so huge that filling a gaming table is something your wife will not like.

Even if I will get those buildings sometime down in the future I decided, this time, to scratch built my own terrain and in the process make small tutorial.

How to create a Scifi Bunker


Intro

  • The idea: Want some generic scifi buildings to decorate my table. These should be generic enough to fill several different roles, from Bunkers, storage facilities to command and control buildings etc.
  • The scale: 15mm ( but you can adapt this tutorial to 28mm or 6mm ).
  • The setting: General scifi with a twist of post apoc ( this way it covers several different genres).
  • The mission: Cheap, fast and simple terrain but that looks nice.
The random Beginning

  • I was thinking on some generic shapes and planning a sketch or two maybe a brainstorming but at the end of the day it was all a big accident. My 4 year old son loves disney toys cars from the movie Cars and I was buying him the 100000000th car at disney store and noticed the blister package of the car I got for him... Shazam! The shape of that plastic was just perfect and instead of trashing it I upgraded it to my bitz box as the future mould of my Bunker.

The material

  1. Some glasses for taking measures of portions
  2. A plastic knife or other flat tool to scrap the excesses
  3. A spoon to mix things up
  4. Plaster
  5. Paper on the floor because its going to be messy
  6. The Uber mould from cars toys blisters

Casting the bunker


  • Read plaster intructions for ratios of water and plaster needed to have a milky cream consistency

  • Add water and plaster to the mould and mix it with a spoon, then smooth things and take off excess plaster with the knife... There will be some bubbles on the wet plaster, remove them by tapping the mould gently several times until all of them burst.

  • Cast as many as you wish, I was happy to have 3 casted before reforming the blister to its well deserved rest into the trash bin.

Decorating to your taste
  • This part is personal and depends on the bits and pieces you have stored in your bitz box, the older the wargamer you are the bigger is your box. I had some plastics from hexagon kits and some GW plastics and some plasticard etc... Fear not if you don't have a bitz box... go hunt for your wife cleaning products or your kids broken toys and if all fails cut some cool geometric shapes from cereal boxes card... You don't like cereals? your doomed XD. So here you go my first scifi storage bunker with a bit of post apocalyptic thing going on.


Conclusion

  • Timing: One weekend.
  • Money Investment: 1 euro on a Kilo of plaster and random bits from bitz box.
  • If you go wild with decorations and start buying expensive materials like etched brass the bunker will look even better but a lot more expensive

Hope you guys liked it, soon I will paint the Bunker and will post it here with all the paint formulas...


Friday 17 June 2011

Old Crow Miniatures

Back to my scifi adventures in 15mm.

I intend to have 2 rifle squads for my rangers and I was shopping for some APC's for them. Since I'm a huge fan of aliens movies I wanted something similar to the Aliens APC. After looking on the web there was one but kind of expensive and out of production, so I hunted down the major 15mm companies and found one that shares some of the Aliens style even if quite different.

I was not sure of Old Crow miniatures casting quality and service but I jumped in nevertheless.
I got these ones:


Well what can I say, the service was good and the Claymore Heavy APC were very crisp and superbly casted. I was also surprised that Old Crow sent me all the weapon options for each of the turrets ( those are going to be very good for some convos).

The scale is also perfect for a squad of 7 rangers plus 1APC driver, I added a 15mm miniature between the 2 APC's for scale purposes.

So I'm very happy with Old Crow Miniatures 15mm Claymore Heavy APC

Check their site: http://www.oldcrowmodels.co.uk/


They have also 28mm and 6mm and the prices are some of the cheapest in the market.

They will get more of my business in the future for sure.

Monday 13 June 2011

Nurgle Terminator Lord commission

I sculpt miniatures for some companies but sometimes I sculpt for private collectors, it's not that common but when there's a cool project on the table I find it hard to resist.

So I was hanging out in a forum dedicated to nurgle (papanurgle forums) and chatting a bit with some friends and then someone presented me the idea to sculpt a nurgle terminator lord packed with battle damage and huge claws but with no apparent mutations apart the fat belly. Cool!

So I draw a sketch 


Client wanted to change legs, add a normal termi helmet and twin bolters to the right arm... So I sculpted and converted the termi.


Client liked it so I shipped the little fat bugger to him and its a concluded project.

Saturday 11 June 2011

Ground Zero Games miniatures

Lets kick star this dung ball with the first project for this blog...
This month I got the 15mm bug and even if I'm mostly a 28mm collector I just could not resist these miniatures.
Some of the best 15mm I have ever seen, these are not only superbly casted and well designed but they have more details than some 28mm outhere.

So here you go I choose 2 diferent rifles packs of UNSC faction at Ground Zero Games.
Check GZG store 15mm stargrunts  HERE
I didn't got the special weapons pack but I wanted a sniper for this platoon so I opened a bit of Greenstuff and sculpted the sniper rifle on a normal rifle fella... Also on the last pic you can see a 28mm mini I converted for scale comparative... these minis are tiny and so far Im having a blast sculpting 15mm .

Welcome

Welcome to Mr. Bug Man blog.

I opened this blog to record all the several miniature projects I start and most of the times never finish.
I have a couple of sites but the structure of those sites is not the best to keep up with the so many random stuff that I do with my miniatures.
Its going to be a bit nonsense sometimes since I jump from one project to another very quickly and I can only promise to not update this blog everyday.
Yup, my free time is short and lets just consider this blog like my random collection of projects recorded on the net... very much like a dung bug makes a ball of crap this is my virtual ball of just that :)


Hope you have fun.

Navarro